Friday, March 29, 2013

Good Friday...

It's Good Friday today, and not just because there's no science homework.

I hope you get some time to reflect on the goodness of God and his amazing love for each of us, and his determination to face unspeakable suffering for the sake of bringing salvation and reconciliation to the world.  "Behold, what manner of love the Father has given unto us, that we should be called the children of God!" 

...and a joyful Easter to you as well.

Tuesday, March 26, 2013

Stop and smell the...


Flowers are an important part of many plants. Plants use flowers to make other plants – to reproduce. Flowers have special parts, called stamens and pistils. When pollen from the stamen finds its way down through the pistil, the flower is pollinated, and seeds start to grow. The seeds eventually find their way to the ground, the seeds sprout, and more plants are born.

Plants have all different styles of flowers. Some flowers have patterns on them that guide bees and other insects to the pollen. Wheat flowers are long and stringy, so when the wind blows, pollen can float easily from stamen to pistil. Some flowers even smell like rotting meat to attract flies. The flies land, pick up pollen on their legs, and dust some of it onto the flowers’ pistils. Although flowers have different shapes, colors, and smells, all flowers make seeds to keep the plant population growing.

Every flower consists of a set of adaptations that help to ensure successful reproduction. For example, flowers often have bright colors, attractive shapes, and pleasing aromas. These traits help them attract insects and other animals that
will carry pollen grains from flower to flower. Pollination also occurs by means other than animals carrying the pollen. For some flowering plants, the wind plays an important role in transferring pollen from plant to plant.


The seed-bearing plants that produce flowers are called angiosperms. The flower produces the seeds, each of which contains a new plant embryo. The parts of the flower are usually found in four whorls, or rings. Petals are one of the four whorls. They attract pollinators. Sepals lie outside the petals. They protect the bud.

The reproductive organs, the stamens and pistils, make up the third and fourth whorls and lie inside the petals. A stamen is a male reproductive part. It consists of an anther that is held up by a filament. The anther produces pollen grains. A pistil is a female reproductive part. Its top is called the stigma. It is sticky to ensure that when pollen grains land on it, they stick to it. The middle supporting structure is the style, and the large base is the ovary, where the eggs are produced.
1. Bill Nye - Flowers! video
23 minutes - 23 points!

2.  Go outside and find 7 flowers (different kinds!) -- locate the stamen and the pistil on each flower. 7 points.

3.  Read Chapter 3, section 1 - about Gregor Mendel and his famous flying peas.    20 points.

50 points possible!  

[Do you crave more science videos? Here's "The Biggest Flower in the World": https://www.youtube.com/watch?v=FHaWu2rcP94&list=PL47D0521D98A9EF1D&index=8]

Friday, March 22, 2013

Worksheet & Review

Homework: Using the handout of onion root tip cells under the microscope, cut  the paper into individual cells and sort them into IPMAT [ Interphase, Prophase, etc...] Don't write on the cells, and skip the cells that are really too blurry to tell! Glue them into a circle --around the edges of the circle, like a clock face, in the order of the cell cycle.  This will give us an idea of how much time this plant spends in each stage. Make it neatly done, label each stage, use good paper, and if you do not understand the directions, CALL me!  Do it right or do it over!

 ALSO - READ CAREFULLY!
Count up how many cells are in each stage, and make a table with 3 columns, like this:


Number
 of cells
% time in this stage
Interphase


Prophase


Metaphase


Anaphase


Telophase


 + Cytokinesis

To find the percentage of time in each stage, divide the "Number of cells" by the total number of cells on the page, and multiply by 100.

Add a Title at the top of the page, and a sentence or two of Summary at the bottom.

When you are done, check to see if you followed the directions completely.
 [If your copy of the handout gets messed up, go here: mitosis onion cells image.]

For reference: here is a website that has good pictures and descriptions.  http://micro.magnet.fsu.edu/micro/gallery/mitosis/mitosis.html

ALSO< Please turn in your chapter 3 review question & answers on Monday. [note to moms of the younger kids: Feel free to modify the lesson according to your own judgement and time constraints.]

Tuesday, March 19, 2013


Multicellular organisms constantly need to make more cells!
  • Each minute your body needs to make ...oh...about 300 MILLION NEW CELLS! A cell spends most of its life working and growing, breaking down sugars, synthesizing proteins, enzymes, and other macromolecules, but cells inevitably wear out, break down and suffer injuries.
  • In addition, as organisms grow and change, they need new cells to make more skin tissue, bone tissue, muscle tissue. These new cells can only come from one place: OTHER CELLS - through the process of cell division, or mitosis.
  • For multicellular organisms (like us) cell division allows an organism to grow and develop from a single cell to trillions of cells, and also  to repair and replace cells worn out and used up by everyday life

On Thursday we will finish off our Mitosis unit by looking at photographs of real cells and trying to figure out which stage the cell is in.  By looking at the pictures above, you can see the difference between a diagram and the real thing.

HOMEWORK: Review chapter two - re-read sections 1-3 and answer the end of chapter review questions.  This chapter has covered the cell membrane and how materials pass through it, photosynthesis and respiration, and the cell cycle- how a cell duplicates itself.

Thursday, March 14, 2013

My Toes Itch

Review: When your body needs new cells, it generates them by MITOSIS!  which is basically sorting the DNA/chromosomes into two sets and then dividing them up so that now there are two cells instead of one.  The new cell contains an IDENTICAL copy of chromosomes.  Each cell in your body, although there are many different kinds, has your own unique DNA -- it is like a genetic fingerprint -- and unless you are an identical twin, no one else has DNA like you do.  That makes you special.

CELLS ALIVE! mitosis Interactive [click to go to site]for fast, click "play" and then slow it down by clicking "step" -- Repeat many times until you've truly understood.

The Cell Cycle has 3 major stages:  Interphase, MITOSIS! and Cytokinesis, and Mitosis has 4 steps.
Here is a way to remember the steps of MITOSIS!
-> Paul Met Anna Twice.--PMAT
Prophase >Metaphase >Anaphase >Telophase


HOMEWORK:  Finish the MITOSIS! flip book, using your textbook or this page, if you wish.  If you need a new copy, go here: MITOSIS! flip book template. 
On the blank pages of the flipbook, write what is happening on that page. -- does this make sense to you?  You should be able to flip the book to see the action, and also to read it like a book with the words on the left hand page and the illustration on the right hand page. Your textbook will help.  If you are not sure what I mean, call me.

And here are some fun videos to watch, made by students:


Monday, March 11, 2013

First, a review of class:
First we demonstrated that breathing out produced CO2 gas. How? by blowing through a straw into a solution of water and bromothymol blue.  Here is another way of doing that:


Then we did the famous elodea in a test tube under lights, and observed the oxygen bubbles that were produced.  It looked like this:

As much fun as watching the grass grow.  But with friends and a sunny day, not bad at all.

Hopefully you looked again at the plants after a few hours.  The elodea under the super-bright light got kinda fried, which of course diminished its ability to photosynthesize!  The plants under the cooler overhead projector lights were cooler and still going strong, as were the sprigs in the sun, (I think those were the most efficient.)  The plants which only received indirect light did not bubble very much; less O2 means less photosynthesis.

Doing these two experiments together illustrated the connection between photosynthesis and cellular respiration.

Watch this video to summarize what we have learned about photosynthesis and cellular respiration:


**********************************************************************
Next subject: Mitosis: how cells replicate themselves
Prepare by reading Chapter 2: section 3  and answering the questions.
You may also wish to watch the brainpop: http://www.brainpop.com/science/cellularlifeandgenetics/mitosis/
  [pcshome / ilearnathome ]

Thursday, March 7, 2013

Transpiration Inspiration - Another Great Celery Experiment

IMPORTANT: Run and tell your mom you will need celery for this experiment.  Promise her that in return for (maybe) running to the store to buy the needed item, you will eat your vegetables, cheerfully, for a week.

What is the role of leaves in transpiration?25 points
Materials: 3 stalks of celery with leaves, glass or jar, red or blue food coloring,  petroleum jelly (Vaseline), knife, metric ruler.

Procedure:
1. Cut 1 cm off the bottom of three celery stalks. (Caution: use knife with care!)
2. Remove leaves from one stalk.  Apply petroleum jelly (Vaseline) on both sides of the leaves of another stalk.  Leave the third stalk alone; it is the control.
3. Place all three stalks in a container containing 5 cm of water and food coloring.
4. Place the beaker in a sunny location. Observe the celery periodically for 24-36 hours.  Record your observations, and perhaps take a photograph.

Analyze and Conclude:
1. Observations: In which stalk did the colored water rise the most?  The least?
2. Inferring: What effect did the petroleum jelly have on transpiration?  What part of the leaf did the petroleum jelly affect?
3. Drawing Conclusions:  How are leaves involved in transpiration?


If you did not complete your homework last week, do so now.  That means read Chapter 2, section 2 and carefully and artistically copy diagram 3 in colored pencils; that's right, the entire diagram on page 40.
 25 points

As an alternative, you may do Brainpop.com [ pcshome / ilearnathome ]  25 points
http://www.brainpop.com/science/cellularlifeandgenetics/photosynthesis/   ////watch movie, fill out vocabulary sheet (activity) and take quiz
http://www.brainpop.com/science/cellularlifeandgenetics/cellularrespiration/  ///same - movie, vocabulary and quiz.

Tuesday, March 5, 2013

Powerful Wet Stuff

Thanks for a fun class yesterday.  To remind you, we discussed the all-important water molecule, so essential for life.  The properties of water included its polarity, cohesion, adhesion and surface tension.  Can you answer these questions in your lab notebook? (copy the question and answer it.)


1.  Write the chemical equation for water.
 
2. Draw a Stick model of a water molecule
  

3. Sketch a group of water molecules, showing where they stick together.


4. How is a water molecule like a magnet?
 
5. What causes surface tension in water?  
 
6. Give an example that you observed of surface tension.
 
7. Define cohesion in your own words.  Give an example.

8. Define Adhesion in your own words. Give an Example.


9.  How might these properties explain how a plant pulls water out of the soil and up to its leaves?  Describe what you think happens.


Next Subject in Science:    Read Chapter two, section 2 (pages 38-41) in your textbooks 
 Cell Energy -- photosynthesis and cellular respiration.
Copy Figure 3 into your lab notebook.

Finally, start collecting 2-liter pop bottles, preferably clear.  Each student will need 5!  Youth groups and other meetings might be a good place for this. 


Friday, March 1, 2013

onion cells & other stuff

 A tale of two experiments...

First, the onion skins, which we looked at under microscopes in class; you peeled a fine layer of cells and mounted it on the slide.  You drew a picture of one or more of the cells with the purple cytoplasm and the cell wall, maybe a nucleus.  Then you added a drop of salt water and observed.  It should have looked like this, before and after:


In your lab notebooks, write up your experiment neatly. Title, description of  procedure, hypothesis (what do you think will happen?) drawings or photos, describe what happened, explain what happened.  In your explanation use the words from your worksheet: osmosis, greater/lesser concentration of water, hypotonic, hypertonic.  Label your drawings or photos with  cell wall, membrane, cytoplasm, nucleus.
(25 points)


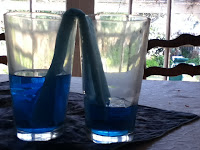
Next, the Home Experiment:  Did it look like this?  I started with two glasses, one was 3/4s full and one was empty.  It took way longer that the directions implied; in fact, it took 24 hours to reach the point where the water levels were equal.  Now I am going to put one of the glasses on top of a book and see how that changes things.

Write this up in your lab books, if you have not already done so: Title, description of  procedure, hypothesis (what do you think will happen?), drawings or photos, describe what happened, explain what happened.